
前言
現在該談談資料庫了,那該如何建立人與人資料庫的連結呢?在 Python 官方文件中會使用 SQLite(sqlite3 模組)當作範例,本文會採用 Python 程式語言連接 MySQL 與 PostgreSQL 資料庫做範例,會是直接連接已存在的資料庫,這裡就不多做建立資料庫的教學了(善用 Google,可以參考 提問的智慧 How To Ask Questions The Smart Way by Eric S. Raymond, Rick Moen)那廢話不多說就讓我們開始吧!
資料庫介面
根據文件 PEP 249 -- Python Database API Specification v2.0 規範所制定了 Python 存取資料庫的標準介面。意思是 Python 要連接每種資料庫,都必須按照這規範實作,但是我們不用重複造輪子,多學學艾連·葉卡站在巨人的肩膀上,直接拿人家做好的套件使用即可(選用一個合適的套件,對於工程師來說也是很重要的能力,取決於你對專案的熟悉程度,而套件是否有人持續貢獻都會影響到專案後續的維護),意思是不要重造輪子或是非我所創的想法出現(關於這點可以參考 Joel on Software 的你絕對不應該做的事 之一 Things You Should Never Do, Part I)。
引述 wikipedia:重造方的輪子是重新創造一個已有的方法(重造輪子),而且其結果比已有的還差(方的輪子)。重造方的輪子是一種反模式(anti-pattern 或 antipattern)!

圖片來源:網路 No thanks, Too busy
所以要連接 MySQL 或 PostgreSQL 資料庫,我們不需要自己重寫。這邊會用到兩個套件,一個是連接 MySQL 用的套件 pymysql、另一個是 PostgreSQL 用的套件 psycopg2。除了套件外,會在著重介紹一套 ORM(Object Relational Mapping)服務 SQLAlchemy, SQLAlchemy 可以與 MySQL、PostgreSQL 連接外,還有不需要直接撰寫 SQL 語法的好處。
ORM 的好處還有
- 開發會更加便利
- 方便維護
- 可靈活設計
- 有較高的移植便利性
當然還是有缺點的像是
- 效能被犧牲
- 學習曲線增加
PyMySQL
一樣進到專案的虛擬環境裡,開啟後安裝 PyMySQL 套件。
pip install PyMySQL

建立一支檔案名為 db.py,使用 vim 文字編輯器,按下 i 貼上範例程式,再輸入 :wq 完成編輯並離開編輯器,這時你就得到一支能與 MySQL 資料庫連結的程式。
vim db.py
# 範例程式
import pymysql.cursors

# Connect to the database
connection = pymysql.connect(host='localhost',  # 你伺服器/主機
                             user='user',       # 你資料庫的帳號
                             password='password', # 你資料庫的密碼
                             database='db',     # 你資料庫的名稱
                             cursorclass=pymysql.cursors.DictCursor)

with connection:
    with connection.cursor() as cursor:
        # Create a new record
        sql = "INSERT INTO `users` (`name`, `email`, `company`) VALUES (%s, %s, %s)"
        cursor.execute(sql, ('Anonymous', 'itisa@sample.code', 'famous-company'))

    # connection is not autocommit by default. So you must commit to save
    # your changes.
    connection.commit()

    with connection.cursor() as cursor:
        # Read a single record
        sql = "SELECT `id`, `company` FROM `users` WHERE `email`=%s"
        cursor.execute(sql, ('itisa@sample.code',))
        result = cursor.fetchone()
        print(result)
範例與使用方式,請參考 PyMySQL README 有更多說明
直接執行程式,會新增一筆名單到對應的資料庫表裡,接著使用 email 搜尋該筆資料後,並將它印出來就會得到下圖的結果。
python db.py

到 phpMyAdmin 查看也能看到成功新增的範例資料。

除了 phpMyAdmin 也推薦更輕量化的 Adminer
psycopg2
攻守交換,換到 PostgreSQL 的回合了!抽牌!一樣先使用 pip 安裝套件,如下:
pip install psycopg2-binary

可以參考 Documentation 的 Installation - quick-install
跟在 PyMySQL 套件做的事情一樣,先建立 db.py 後,把下列的範例程式碼放進去。程式碼的 psycopg2.connect 有兩種寫法,看個人喜好擇一寫法就好。更詳細的內容可以參考 The psycopg2 module content。
import psycopg2

# Connect to your postgres DB
conn = psycopg2.connect("dbname=test user=postgres password=secret") # 亦或是 dbname="test", user="postgres", password="secret"

# Open a cursor to perform database operations
cur = conn.cursor()

cur.execute("""
    INSERT INTO users (name, email, company)
    VALUES (%s, %s, %s);
    """,
    ("Hermit", "itissecond@sample.code", "best-company"))

# Execute a query
cur.execute("SELECT * FROM")

# Retrieve query results
records = cur.fetchall()

# Make the changes to the database persistent
conn.commit()

# Close communication with the database
cur.close()
conn.close()
在 Terminal 裡執行 db.py
python db.py

去到 Adminer 查看新增的結果。

有沒有發現不管是使用 PyMySQL 或是 psycopg2 套件,都要寫 SQL 語法做 CRUD,未來下的 SQL 越多越複雜時,就難保會不出錯亦或是不好維護,是 ORM 當場的時候了(當然 ORM 也不是萬能。
SQLAlchemy
終於到了介紹 SQLAlchemy 的環節了,SQLAlchemy 是一個 Python 操作資料庫的工具,基本上可以分成三個部分:
- DBAPI
- SQLAlchemy Core
- SQLAlchemy Object Relation Mapping (ORM)
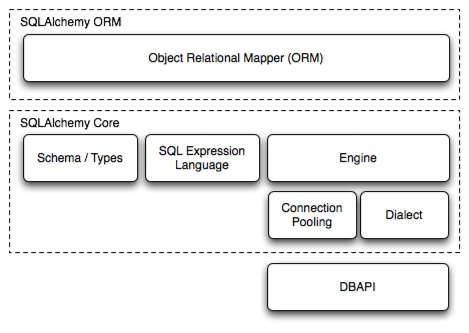
下圖是 SQLAlchemy 框架的各個元件組成:
- Engine:框架引擎
- Connection Pooling:資料庫連結池
- Dialect:資料庫DB API種類
- Schema/Types:架構&型別
- SQL Exprression Language:SQL表示式語言
ORM 可以想成是透過 Python 產生的一張資料庫地圖,用於與資料庫溝通、操作的工具。ORM 這個機制除了將資料庫的資料轉成物件外,大部分的資料庫操作都可以透過物件去實現,例如建立、新增、刪除等,甚至是建立資料表之間的關聯也可以用物件實作。在開始寫 ORM 前,不免俗還是要安裝套件。
pip install SQLAlchemy

更多安裝方法可以參考 SQLAlchemy Documentation Installation Guide
一樣在 db.py 裡填入 ORM 的範例程式,裡面包含描述關於 users 資料表,建議將它單獨出一份存放,在新建一個 models.py、放在這個檔案裡。
from sqlalchemy.ext.declarative import declarative_base
from sqlalchemy import Column, Integer, String, create_engine
from sqlalchemy.orm import sessionmaker

# 宣告對映
Base = declarative_base()

class User(Base):  # 建議放到 models.py 裡
    __tablename__ = 'users'
    id = Column(Integer, primary_key=True)
    name = Column(String(50), nullable=False)
    email = Column(String(50), nullable=False)
    company = Column(String(50), nullable=False)

engine = create_engine('postgresql://postgres:secret@localhost:5432/test', echo=True, future=True) # MySQL 的連接方式 'mysql+mysqlconnector://user:password@localhost:3306/test'

Session = sessionmaker(bind=engine)
session = Session()

session.add(User(name='ed', email='ormtest@gooogle', company='Gooogle'))
person = session.query(User).filter_by(name='ed').first()

session.commit()

print('Who is: ', person)
接著執行 db.py
python db.py
把執行結果印出來

在 Adminer 裡,也可以看到新增的聯絡人。

關於各類資料庫的 Database Urls 表述方式,可以參考 SQLAlchemy Documentation Engine Configuration裡頭有更多說明
總結
本篇談論資料庫連接就先到這,看到這裡的你,想必還是有些感到困惑的地方吧!不管是使用 cursors、connection 模組,抑或是使用 SQLAlchemy engine,資料庫的使用者密碼資訊都被看光光,下一篇會談 configuration 與 environment variables,將敏感的資料放在 .env file 裡,還不是直接放在明碼,那我們下一篇見。


